
 The last piece to build for the kitchen is a counter-height something or other to go to the left of the stove. But there are a few challenges (aren’t there always) and design considerations.

On the other end of the same run, I simply notched the counter for the door trim, and fit the cabinet frame flush with the trim. No window sill to get in the way.
The curve is the most noticeable and vexing thing; it starts about 19″ to the left of the stove, and continues around to about 4″ behind the window trim. And that window trim? It encroaches on about 3″ of the counter depth – not to mention the sill juts out a couple inches.
While I suppose I could build a base cabinet that fits the curve, I simply don’t want to. A square one shallow enough to avoid dealing with the curve wouldn’t offer enough storage to be worth the trouble (plus it would annoy me to know there’s wasted space behind). And anyway, I don’t think it would look good to have a cabinet bumping into the window (the sill in particular would be a problem).
Besides – I spent a fair amount of time and effort kerfing that baseboard to conform to the curve. I’m not about to cover it up. (Yeah, yeah – I still need to do the curved shoe moulding…seriously considering a flexible product for that.)
Also, I want a covered place (that is, not in a footpath) to stash the cats’ food bowls and dry-food container, with enough room for them to comfortably eat (and enough room for a decent-sized dog to get under, in case potential new owners prefer canines).
So something more in a table vein seems in order. But I wouldn’t like how a leg at the front-left corner would visually compete with the window trim and baseboard.
So I played around in SketchUp and came up with the following, which progress from “Oh HELL no” to “Hell no” to “Eh, maybe” to “Yeah, I think so.” I’m still waiting for “Heck yeah!” to strike. (And there’s the slim chance that I might punt – but probably not.)
I already have the countertop (same Ikea Numerär) I used for the rest, and the legs are spaced not only to be visually appealing (to me, anyway), but to accommodate a towel rail. I think that would look more elegant than my current solution of hanging towels from the stove and/or dishwasher handle.

It’s functional, I suppose (and matches the rest of the cabinets, of course), but there is ample cabinet space already – about 40 percent more than what I tore out. Also, to my mind it implies I couldn’t build a properly sized space-filling cabinet, and therefore makes everything look like stock cabinets from the big-box…which is what I tore out because they didn’t fit and were clearly cheap stock cabinets from a big-box rather than pieces custom-made to fit the space. (It’s possible I’m overthinking things.)

This is too blocky and too basic. The straight legs look too heavy, though the straight lines would match the square cabinets. Really what it comes down to is I just don’t like it.

The tapered legs here (I’d probably taper them on two sides rather than on only the one side drawn) lighten things up a bit and make it look more design-y (technical term). But it feels like a wasted opportunity to introduce another storage option to the space as whole. And only an Irish wolfhound needs that much height to fit under (and since an Irish wolfhound would not fit in this house at all…)
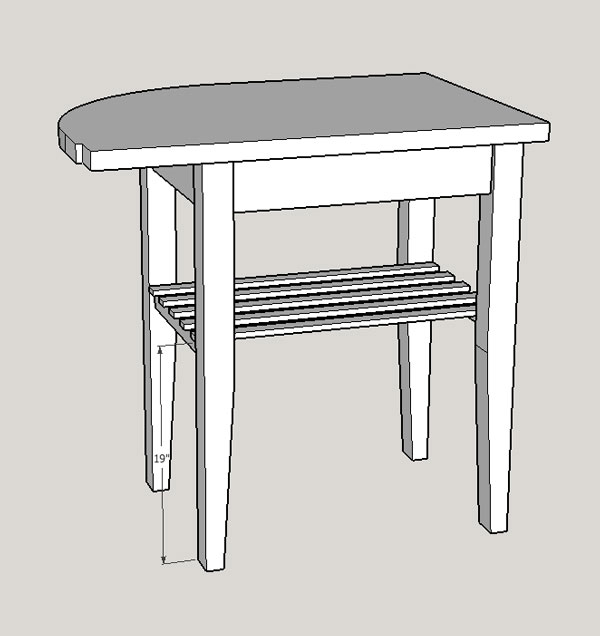
This one, I’m almost sold on. The taper starts below the slat shelf, a shelf that seems like a good place to store a bag of potatoes or onions, or to simply display a nice bowl. The 19″ clearance under it to the floor is plenty for my cats (and their food-storage bin) and for a medium-sized dog. But I’m not sure about, say, a Labrador retriever.
I suppose the third iteration could work, but I feel as if I’d have to add a drawer, so that it can masquerade as a desk/worktable (and then where would the towels go?). But a drawer means more work than simply grabbing the Domino to make a simple, solid base (don’t hate – it’s a kitchen counter, not an heirloom build; hand-cut tenons need not apply).

To me, your legs need to be smaller or your top thicker. I also think if you drop the lattice shelf lower you might not need a drawer.
I wouldn’t worry about the Labrador – you can’t design for all eventualities – avoid analysis paralysis! Besides, what if they have fish?
I agree with dropping the shelf a little – or maybe make the apron a little skinnier?
Big-box look or not I’d prefer the enclosed cabinet choice. Storage out of sight and dust catching is always useful. That design option is GREAT!.
box on legs to match the cabinets you build, also a removeable shelf would be nice below cabinet.
My two cents:
1) The kitchen will look better with a closed cabinet. (It looks more finished to a perspective buyer.)
2) Bendable plywood for the interior. Who says the cabinet has to be a square one? Only the door and faced frame need to be straight.
3). Cabinet set back 3″ or notch counter for window trim. ( Setback is not a big deal because the stove is a break from the other counter top.)
4) Filler piece next to window wall large enough to handle trim issues.
5) Wasted space not an issue if you get something like this:
http://www.leevalley.com/US/hardware/page.aspx?p=66478&cat=3,43648,43653&ap=1
6). Cat food and everything stored out of sight.
7) Cat bowls under window between new table and new cabinet. They are out if the foot traffic there.
Ok that was more like 3 cents worth, but I think the house will show better.
Good luck.
Super impressed by the cabinets – could you point those of us considering a kitchen remodel of our own to a good resource on building cabinets as nice as yours?
You’re very kind; thank you.
Really, I just looked at pictures…a LOT of pictures, and over several years as I developed the courage to start ripping things out. So I knew exactly the look I was going for: face-frame cabinets with inset doors. Then, I drew it all out in SketchUp just to make sure what was in my head would look OK on paper.
As I was preparing to build, I read a couple books on making these kinds of cabinets (which are, or at least should be for one’s sanity, different than building the free-standing furniture pieces I’m more familiar with). The best one, IMHO, is Bill Hylton’s “Illustrated Cabinetmaking.”
Put a couple of baskets side by side for potato and onion storage at the top. It would seem to me to give it a more finished or purposed look.
I was referring to the third iteration.
I’d lean towards a full cabinet. But don’t think about building it like a normal cabinet. That is, instead of building a box and then sliding into place – build the cabinet in place. (been there, done that in an old house with “interesting” walls)
The front is a normal face frame that you build first, but don’t fasten until you build the rest.
No need to make a left hand side or back to the cabinet. Make a right hand piece, attach some cleats to that and to the wall for supporting shelves. A little construction adhesive for attaching the shelf supports to the wall is excellent. Then cut plywood for shelves and attach to the cleats. The interior plywood shelves don’t even have to fit that tight to the wall – the back edge can be caulked & painted. Anyone who sticks there head into the cabinet far enough to see that you caulked that gap is in perfect position to have a boot applied to their posterior.
The only tough / critical scribing job is cutting the counter top to fit the wall, but you’ve already committed to doing that.
Building a cabinet in place like this is more carpentry than woodworking – but in old homes sometimes that is the best & easiest way to go.
That’s what I was thinking. Do it on site. The bendable plywood glued to the wall to “finish” the interior.